Hiển thị các bài đăng có nhãn Easter decorating. Hiển thị tất cả bài đăng

Thứ Ba, 2 tháng 4, 2013

Neon decorated wooden letters

Easter decorated letters

I bought some "Happy Easter" MDF letters at the Make it & Knit it craft show. I decided to decorate the letters in the same prints that I used for my Neon bird houses. Here's how...

Neon decorated wooden letters
Tools and Materials
  • Neon pink acrylic paint
  • Neon yellow acrylic paint
  • PVA glue or Modge podge
  • Grey And white geo printed paper
  • Peach and white geo printed paper
  • Scissors
  • Sharp pencil

Neon decorated wooden letters, How-to step by step
Decorating MDF letters
Start by tracing round the letters on to your printed paper and cut out. Then carefully paint the outside edges of the letters with neon paint and leave to dry. Apply a thin layer of glue on to the MDF letters and adhere cut out printed letters to them, leave to dry. Paint a thin layer of modge podge over the printed papered MDF letters, leave to dry.

Easter letters

Decorated Easter letters

I love my decorated wooden letters that I have decided to place the "Happy" word in my craft room!

Have a sweet day!
Chủ Nhật, 31 tháng 3, 2013

Happy Easter!

Chocolate bunny

Wishing you all a "Happy Easter"!

Easter table

Easter table setting

Nest cupcakes

I will be back next week with more photos, all the details and recipes...

Have a sweet day!

Chủ Nhật, 15 tháng 4, 2012

Bunny Art

My bunny print

A while back the lovely peeps at Hello Canvas offered to print a 24x32 inch canvas for free for me to review; all I needed to do was send them my favourite picture. It took me ages to decide what picture to send, but I eventually decided to design a print for my canvas that I could hang on the wall at Easter and give to my younger sister afterwards to hang in her new nursery as we both share a love of aqua! The nursery is not quite finished but as soon as it is I will be sure to share a photo of it with you.

Hello Canvas are specialist canvas printers and they offer a 100% satisfaction guarantee, lowest price guarantee and delver for free within one week! What's not to love?

I can't tell you how impressed and excited I got when it arrived. It was so perfect that I had to ring my sister right away and tell her. She immediately popped round and got really excited too. It was printed on high quality canvas using UV-protected inks and then hand stretched onto a 1.2" thick wooden frame, wrapped in environmentally friendly plastic and sent via UPS in a custom-made box. They were such a pleasant company to deal with and helpfully advised me that the light aqua color I had in the background of my print would look nicer if they carried this color to the edge of the canvas. They were right. Oh, and once I had sent my artwork the turn around was super fast! Both my sister and I are delighted! Thank you Hello Canvas.


Bunny art close up

Have a sweet day!

Thứ Tư, 11 tháng 4, 2012

Mini gluten free berry chocolate cupcakes

Mini gluten free berry chocolate cupcakes by Torie Jayne

Mini gluten-free berry chocolate cupcakes (makes 48 mini size cupcakes)

Ingredients


Cooking instructions
  1. Preheat oven to 160-180 deg C (325-350 deg F)
  2. Line cupcake tin with paper cases or tray with silicone cases
  3. Beat butter and sugar with an electric mixer until the mixture turns a pale colour
  4. Beat in eggs, flour, milk and vanilla extract
  5. Fold in the dark choc chips and raspberries
  6. Pipe batter into cases
  7. Bake for 20-25 minutes or till cakes bounce back when lightly pressed
  8. Place cakes on a wire rack to cool

To decorate (for 48 mini sized cupcakes)
Ingredients
  • Chocolate buttercream
  • Desiccated coconut
  • Fondant flowers
  • Jelly beans

Peach fondant flowers


Instructions
  1. Fill piping bag fitted with star nozzle full of chocolate buttercream
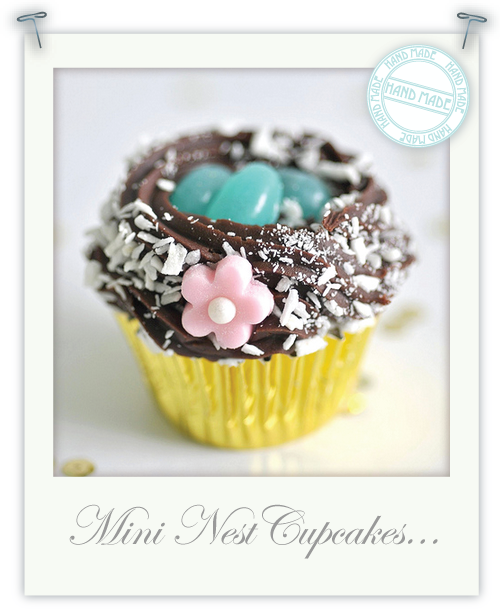
  2. Pipe a nest on top of cupcakes
  3. Sprinkle with desiccated coconut
  4. Push fondant flower into side of nest and three jelly beans in the centre of the piped nests

Mini nest cupcakes
My Easter Table


Mini chocolate nest cupcakes

Have a sweet day!

Thứ Năm, 5 tháng 4, 2012

Glitter eggs

Glitter eggs by Torie Jayne

For this year's Easter tree, that I am in the process of making, I need some new eggs to hang on it. I have recycled my previously painted eggs from my Easter 2010 table by covering them in glitter to match this year's Easter colour scheme of mint, peach and gold.

Glitter eggs
Tools and Materials

Glitter eggs, How-to step by step
Glittering eggs

Start by carefully removing the plastic stopper from the plastic eggs. Then brush PVA glue on to top of eggs. Sprinkle coloured glitter onto glued area of eggs. Tap gently to remove any excess glitter, and leave to dry. Push egg hangers into hole at top of eggs and thread gold embroidery thread through loop in egg hanger, and knot to secure. Brush PVA glue onto rest of eggs and spoon glitter onto eggs, covering entire surface. Tap gently to remove any excess glitter, hang and leave to dry.


Glittered hanging eggs
Glittered Easter eggs

Have a sweet day!

Thứ Tư, 4 tháng 4, 2012

Pretty painted egg cups

Pretty painted egg cups by Torie Jayne

I have had my wooden egg cups since 2010 when I painted them in pastel colours. To refresh them for this year I have given them a new lick of paint and filled them with gold foil eggs from Hotel Chocolat.

Pretty painted egg cups
Tools and Materials

Pretty painted egg cups, How-to step by step
Hand painted wooden egg cups

Following the instructions on the spray paint, carefully spray the wooden egg cup until you have an even coat of paint and the original colour of the egg cup is no longer visible. Leave to dry. Carefully paint the inside with gold paint and leave to dry.


Painted egg cups
Easter egg cup

Have a sweet day!

Thứ Ba, 3 tháng 4, 2012

Bunny jars for Easter

Bunny jars for Easter by Torie Jayne

As soon as I saw the animal storage jars on House to Home I knew I had to make them, but when and what for?!? So when I saw a similar idea on the German site, Living at Home but this time with bunnies on top as an Easter packaging idea, I knew this is what I could make them for. I set about finding some cute plastic bunnies and spray paint in my Easter colours. It took me longer to find the right colour spray paints but I was delighted to discover that Fred Aldous sells a really large array of coloured spray paints from Montana and that Montana White is glossy whilst Montana Black is matte. I so loved spraying the jars that I ended up spraying my metal windmills that were looking a bit worse for wear having sat in the garden for a few years. I think I might have a new addiction, so stay tuned for more of my adventures in spray painting... who knows what!?!

Bunny jars for Easter
Tools and Materials

Bunny jars for Easter, How-to step by step
Making bunny jars


Start by carefully gluing the rabbit to the jar lid and leave to dry. Place lid on a platform you don't need (I used an old glass pot I did not need anymore). Following the instructions on the spray paint, carefully spray the glued rabbit and lid until you have an even coat of paint and the original colour of both the rabbit and lid are no longer visible. Leave to dry. Fill with Easter treats.

Bunny jars
Bunny jars to fill for Easter
Aqua bunny jars
Bunny jar filled with eggs


Have a sweet day!


Thứ Hai, 2 tháng 4, 2012

My Easter decorations part 3

My Easter decorations part 3

Continuing my Easter colour scheme of mint, peach and gold, this past weekend I have been spray painting egg cups and making bunny jars to fill with Easter treats! I have also been doing a fair amount of glittering and paper punching more flowers for my Easter tree, leaving me time this week to make Easter sweet treats to my heart's content!

Also don't forget today is the last day to enter my Oodles of Eggs giveaway.

Have a sweet day!

Thứ Năm, 29 tháng 3, 2012

Candy Easter Eggs

Candy Easter Eggs

Last year I made candy filled Easter eggs and they went down a treat with the kids when I hid them in the garden as part of my Easter egg hunt. So this year I made them again, but this time filling them with vanilla, bubblegum and blueberry flavoured Jelly Belly beans to match my colour palette.


Candy Easter Eggs
Tools and Materials

Candy Easter Eggs, How-to step by step
Making candy filled eggs for Easter

Start by washing and drying the plastic eggs. Then wrap a line of washi tape around the bottom half of the egg top, follow by wrapping a layer of lace tape over the washi tape. Cut ribbon to size and knot ends, thread through hole in top of egg and fill egg with jelly beans or small candy and carefully snap together.


Candy filled eggs
Trims for candy filled eggs

Have a sweet day!

Thứ Ba, 27 tháng 3, 2012

Paper Flowers for Easter

Paper Flowers for Easter

This past weekend I started to make paper flowers for my Easter tree and the little bunnies wanted one each! So now I have a few less for my tree, but don't they look cute!


Paper Flowers for Easter
Tools and Materials

Pretty Easter Egg boxes, How-to step by step
Making paper punch flowers

Start by punching out the petal pairs until you have a pair for each flower you want to make. Place one of each petal on top of each other and tuck one punched petal shape into another to create a beautiful flower. Then carefully push the craft pick through the centre of each flower so you have a small hole in the centre. Thread a sequin onto a stamen and thread the stamen through the hole. Glue in place.


Butter dish to fill
Flower Bunnies


Have a sweet day!

Thứ Năm, 22 tháng 3, 2012

Easter mini bottle labels

Easter mini bottle labels

At Christmas I made mini labels for my bottles and filled them with flavoured milk. I don't know who liked them best, the kids or the grownups! So to keep my Easter Egg hunters' thirst quenched, I have made some pretty lace bunny and polka dot labels for my mini bottles that I will fill with milk or fresh peach lemonade! Please feel free to enjoy the labels for yourselves.


Easter bottle labels

Easter mini bottle labels
Tools and Materials

Easter mini bottle labels, How-to step by step
Mini bottle labels
Start by printing off the Easter lace bunny bottle labels onto a label sheet. Carefully cover the printed labels in sticky back plastic and carefully cut out. Stick cut out Easter lace bunny bottle label around bottle.


Easter milk bottles
Easter milk bottles
Easter milk bottle labels
Have a sweet day!

Thứ Ba, 20 tháng 3, 2012

Pretty Easter Egg boxes

Easter Egg boxes

On Saturday I launched my Oodles of Eggs giveaway and showed you how I shall be packaging some of my gold eggs to hide in the garden. Today I wanted to share with you where I bought my turquoise egg boxes (a snip at £3.50 for 30!) and share my labels for you to enjoy.


Easter lace bunny labels

Pretty Easter Egg boxes
Tools and Materials

Pretty Easter Egg boxes, How-to step by step
Pretty packaged chocolate eggs

Start by printing off the Easter lace bunny labels onto a label sheet and carefully cut out. Stick Easter lace bunny label on to top of egg box. Fill box with shredded paper and push cupcake wrappers into egg grooves, and fill papers with foil wrapped eggs. Tie ribbon around box to secure and there, all ready to be hidden!

Easter Gift
Oodles of eggs packaged
Milk chocolate egg

Have a sweet day!