Hiển thị các bài đăng có nhãn Winter Woodland Christmas. Hiển thị tất cả bài đăng

Thứ Bảy, 8 tháng 1, 2011

Doe Tags

Doe Tags by Torie Jayne

Doe Tags

You will need:
Winter Woodland doe tags printed out on heavy paper

Equipment
Small circle
Cutter
Paper punch - Accents 'Snowflakes'

Instructions
  1. Open doe print template (see image below) and print it out.
  2. Cut around doe tag (I use the Shape Mates small circle and cutter to cut out my circles).
  3. Punch out one of the small snowflake icons on the template to allow threading.
  4. Thread with desired ribbon, thread, yarn etc.


Doe Tags
Rik rak and handmade gift tags

Have a sweet day!

Thứ Sáu, 7 tháng 1, 2011

My Gift Wrapping

House gift boxes
Decorative masking taped package
Hand printed paper
Mini luggage tags
Gifts
Polka dots gift wrap
This year I wrapped my Christmas presents in a combination of brown craft paper and snowflake printed foil wrap. I decorated my packages with MT masking tape, tied them up with spotty ribbon, rik-rak and yarn. The To's and From's were written on a mix of mini luggage tags and hand made doe tags. A post with free downloadable graphic is coming soon, ready for next year!

The little house boxes from Target were filled with coloured tissue-wrapped stocking fillers to introduce colour at the windows. I bought an extra set of the house boxes that I want to pop LED tea lights into next year and make a feature of them.

Have a sweet day!

Thứ Sáu, 24 tháng 12, 2010

Painted metal bird

Painted metal bird
To get the touch of silver sage green colour on my Winter Woodland Christmas tree, I am planning to hang a few pretty painted metal birds. This one usually hangs in my bird cage.

Bird Cage!

Have a sweet day!

Thứ Hai, 20 tháng 12, 2010

Deer printed bags of honeycomb

Deer printed bags of honeycomb by Torie Jayne

Deer printed bags

You will need:
White sweet bags
P1 address labels
Baby deer rubber stamp
Snowflake rubber stamps
Color Box copper pigment stamp pad

Equipment:
Shape-mates circles
Shape-mates carriage
Glass cutting mat

Instructions
  1. Rubber stamp deer and snowflakes on paper bag, leave to dry.
  2. Click the label picture below to open in separate window, ready to print.
  3. Print labels onto P1 address labels.
  4. Place label sheet on glass cutting mat.
  5. Cut out using the small shape-mates template and carriage (video instructions here).
  6. Fill bag with hand-made honeycomb (click for recipe).
  7. Fold over top of bag.
  8. Peel off back of label and carefully stick to secure top of bag down.


Hand-made honeycomb as gifts
Deer stamp
Honeycomb labels

Have a sweet day!

Chủ Nhật, 19 tháng 12, 2010

Winter Woodland treat boxes

Winter Woodland treat boxes by Torie Jayne

Winter Woodland treat boxes

You will need:
Winter Woodland treat box printed out on heavy paper
Double sided tape
Polka dot glassine bags
Ribbon

Equipment
Tim Holtz non-stick micro-serrated multicutter
Mini rotary perforator
Paper punch - medium '1cm ribbon'

Instructions
  1. Open cone print template (see image below) and print it out.
  2. Cut around cone wrapper, (I use the shape mates large circle and cutter to cut out my circles).
  3. Roll perforator along all lines.
  4. Fold all perforated lines away from you.
  5. Place a couple of strips of double sided tape on the unprinted side of the bottom of the box, but do not peel backing off tape yet.
  6. Place a strip of double sided tape on the unprinted side of the long sides of the box, do not peel backing of tape yet.
  7. Place a strip of double sided tape along all four white strips of printed side of box and remove backing.
  8. Assemble box and press together to stick.
  9. Fold over top of cellophane bag by 10cm.
  10. Place fold inside paper ribbon punch and push to end. Punch ribbon holes.
  11. Remove backing from double sided strips on inside of box.
  12. Open glassine bag out and place inside box, pressing against the tape to fix in place.
  13. Fill with treats.
  14. Thread ribbon through holes and tie in a bow.


Winter Woodland treat boxes by Torie Jayne
Home-made Maple Cakelets
Iced squirrel hiding
I filled mine with Maple cakelets in pine cone, walnut and acorn shapes, with a hidden iced squirrel!

Have a sweet day!

Glass marbled snowflakes

Glass marbled snowflake by Torie Jayne
Glass marbled snowflakes

What you will need
Plastic snowflakes
White paint
PVA glue
Tiny glass marbles
Embroidery thread

Instructions
  1. Paint snowflakes, leave to dry
  2. Paint PVA glue onto painted snowflake.
  3. Sprinkle tiny glass marbles over snowflake and leave to dry.
  4. Thread embroidery thread through hole.

I just had to try out my new tiny glass marbles on some of my cheap plastic snowflakes. I love how they turned out!


Plastic Snowflakes
Glass marbling snowflakes
Glass marbled snowflakes
Have a sweet day!

Thứ Bảy, 18 tháng 12, 2010

Winter Woodland candy cones

Winter Woodland candy cones

Winter woodland candy cones

You will need:
Cone wrapper
Double sided tape
Polka dot cellophane
Ribbon

Equipment
Tim Holtz Non Stick Micro-Serrated Multicutter
Shape~Mates Circles
Shape~Mates Carriage

Instructions
  1. Open cone print template (see image below) and print it out.
  2. Cut around cone wrapper and along lines to give 3 wrappers. (I use the shape mates large circle and cutter to cut out my circles.
  3. Roll one of the wrappers into a cone shape and, using double sided tape, fix in place.
  4. Place a second piece of tape inside the cone along one side and peel off backing.
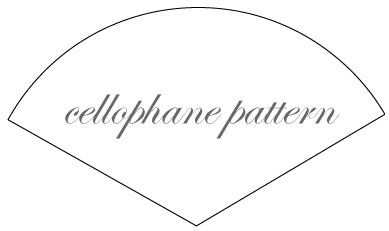
  5. Cut out cellophane (use the "cellophane pattern" below as a stencil to cut out your cellophane - note each straight line is 24cm long).
  6. Roll cellophane into a cone shape and place inside cone wrapper. Press against the tape to fix in place.
  7. Fill with candy.
  8. Tie ribbon around the top.


Making Candy Cones
Winter Woodland Candy Cones
Cellophane pattern

Last year I made candy cones for Halloween & Christmas. This year I custom designed some for a friend of mine to give out as wedding favours. Four of us spent several hours putting together over 100 of them to be filled with sugared almonds. So, this Christmas I have designed them around my winter woodland theme and filled them with hand-made nut shaped chocolates with creamy maple centres.

Maple cream filled hand made chocolates


Have a sweet day!

Thứ Sáu, 17 tháng 12, 2010

Thứ Ba, 14 tháng 12, 2010

Winter Woodland Christmas cake

My Winter Woodland Christmas cake by Torie Jayne
My Winter Woodland Christmas cake
Sugar pearls and glittered leaves
Iced deer in the woodland
Snowy mushroom cookie
I made my Christmas cake a few weeks ago, and have been feeding it with brandy to keep it moist and taste even lovelier! Then came the fun part: decorating it. I want it to be the centrepiece of my Winter Woodland dessert table so I went for a sugar paste reindeer sitting amongst a snowy woodland. Here's how I did it:

Winter Woodland Christmas Cake

Ingredients
Christmas cake (gluten free recipe)
Marzipan
Apricot baking glaze
Roll on white icing
Royal icing
Sugar paste reindeer x 1
Sugar paste acorns x 5
Iced leaves x 35
Meiji mushroom cookies x 2
White hologram glitter
Brush on dust in Ivory Shimmer
White petal paste
Icing sugar
Sugar pearls
Chocolate orange Matchmakers broken into pieces 3-5 cm long

Equipment
Cake stand or board
Rolling pin
Cake smoother (optional)
Sieve
Ribbon
2 pins
Icing bag fitted with star nozzle

Decorating instructions
  1. Place cake on cake stand upside down so top is completely flat.
  2. Knead marzipan into a ball.
  3. Dust icing sugar onto a hard clean surface and roll out marzipan to 5mm thick.
  4. Melt the apricot jam.
  5. Brush cake with apricot jam.
  6. Lift up marzipan using rolling pin.
  7. Place on cake and smooth out so entire cake is covered in marzipan.
  8. Cut off any excess, leave to dry for 24 hours.
  9. Knead roll on icing into a ball.
  10. Dust icing sugar onto a hard clean surface and roll out roll-on icing to 5mm thick.
  11. Lift up icing using rolling pin.
  12. Place on cake and smooth out so entire cake is covered in icing. (I use a cake smoother to give it a polish and professional finish)
  13. Push sugar pearls into side of cake where cake meets cake stand.
  14. Wrap ribbon around side of cake and secure with 2 pins.
  15. Make up royal icing as per instructions on packet.
  16. Spoon some royal icing in a large circle on top of the cake, using a fork to lift it into snowy peaks.
  17. Lightly push sugar paste reindeer into royal icing in centre of cake.
  18. Lightly push leaves and chocolate Matchsticks into royal icing around outside edge of circle.
  19. Lightly push mushroom cookies and acorns into royal icing around reindeer.
  20. Spoon remainder of royal icing into piping bag with a small star nozzle at the end.
  21. Pipe a small amount of icing onto back of leaves and press into centre of ribbon around cake.
  22. Dust cake in sieved icing sugar.
  23. Sprinkle cake in white glitter.

Have a sweet day!

Petal paste Reindeer

Petal paste Reindeer by Torie Jayne

Ingredients

Equipment

Instructions
  1. Coat your deer in Vaseline.
  2. Paint a thin layer of latex over sides and allow to dry.
  3. Repeat step 2 over several days until you have a layer about 5mm thick.
  4. Leave to dry for 12 hours.
  5. Carefully pull off latex mould from reindeer.
  6. Dust the inside with icing sugar.
  7. Thoroughly knead sugar paste.
  8. Push paste into mould, so head is full of petal paste.
  9. Push petal paste into body of reindeer so all sides have at least 20mm of petal paste on them.
  10. Leave to dry for about 30 mins.
  11. Carefully pull mould away from the icing, starting at the back.
  12. When you get to the neck begin to carefully cut mould away.
  13. Put petal paste reindeer to one side.
  14. Bend wire into antler shape.
  15. Mould with your fingers some petal paste around wire antlers, leaving a prong at the end.
  16. Push antlers into top of head.
  17. Push iced robin into petal paste reindeer's back.
  18. Brush ivory shimmer dust on reindeer's hooves and antlers.
  19. Leave to set hard.


Petal paste reindeer
Sugar paste reindeer
Petal paste wire antlers
Back of Iced Reindeer
I love my Christmas Deers from Camel & Yak, so much so that I couldn't think of anything more perfect to go on top of my Christmas cake this year. So, I decided to make a latex mould from the doe and hand craft the antlers from wire and petal paste. I love how he turned out, even if his neck is a little on the wrinkly side! That came from me being clumsy when I cut the latex mould from around the petal paste. I was worried if I didn't get him out from under the latex he would not dry properly and in my haste his head fell off! I re-attached it back on with a wooden cocktail stick and painted over the join with royal icing.

Thank you to the lovely ladies at Blue Ribbons who gave me advice on how to make my hand-made doe mould.

Have a sweet day!