Hiển thị các bài đăng có nhãn Candy. Hiển thị tất cả bài đăng

Thứ Tư, 5 tháng 12, 2012

Chocolate bark

Chocolate bark

Last Christmas I made chocolate bark with crushed candy. It went down such a treat that I have already had requests for it this year!

Chocolate bark (makes about 20 pieces)

Ingredients
200g dark chocolate
300g white chocolate
Crushed, broken candy canes


Cooking instructions
  1. Coat a 38cm x 30cm, 1.5cm deep rimmed baking sheet with cooking spray, and line with baking paper
  2. Melt the dark chocolate in a bain marie or in a microwavable bowl in the microwave on low power.
  3. Pour into the baking tray and spread out to get an even layer, leave to set
  4. Melt the white chocolate in a bain marie or in a microwavable bowl in the microwave on low power.
  5. Pour into the baking tray over the dark chocolate and spread out, immediately sprinkle chocolate with crushed candy canes and leave to set
  6. Refrigerate until firm, about 1 hour.
  7. Peel off baking paper, and break bark into pieces.

Here they are on last years Christmas Winter Wonderland dessert table...

Chocolate bark

Candy floss topped candy jar

Have a sweet day!

Thứ Tư, 31 tháng 10, 2012

Candy Corn

Candy corn

Happy Halloween! I have been knee deep in DIY this week so only managed to squeeze in one Halloween treat...

When I lived in New York I discovered candy corn and loved it! It can be bought in the UK but only from stores that specialize in American candy. So this year I decided to make my own in colours to match my Halloween theme of pink, black & white. As well as the traditional triangle shape I also made a few pumpkins, bones, skulls and roses.

Candy Corn (makes about 80 pieces)

Ingredients
280g icing sugar ( confectioners sugar)
225g caster sugar
20g (1/4 cup) dry powdered milk
1/4 teaspoon salt
242g (3/4 cup) glucose syrup or golden syrup (corn syrup)
76g (1/3 cup ) unsalted butter
1 teaspoon vanilla essence
Hot pink food colouring
Black food colouring

Cooking instructions
  1. Place icing sugar, powdered milk and salt in a separate bowl and set to one side.
  2. Place caster sugar, syrup and butter into a heavy based saucepan and bring to boil over high heat continually stirring.
  3. Reduce heat to medium and cook for a further 5 mins.
  4. Remove from heat and stir in vanilla essence.
  5. Add powdered milk mixture to saucepan and stir till combined. Leave till mixture is warm to the touch
  6. Separate mixture into three bowls
  7. Add pink food colouring to one portion of dough and knead till colour is even.
  8. Add black food colouring to one portion of dough and knead till colour is even.
  9. Roll each piece into a thin rope.
  10. Push the three ropes together to create a long rectangle.
  11. Gently press them together with a rolling pin.
  12. Cut into small triangle pieces and in your fingers roll into desired shape.
  13. Leave to dry for one hour on sheets of baking paper.
  14. Store in an airtight container, in layers separated with baking paper.

Candy corn skull
To make the tiny roses I used my rose mould from Nabby

Happy Halloween!

Thứ Ba, 10 tháng 7, 2012

Hello Kitty raspberry jelly candies

Hello Kitty raspberry jelly candies

This Summer I will be making my niece Molly's third birthday cake. For her first birthday, I made a pastel coloured jungle themed cake to match her gift of a jungle bench I hand-painted in pastels with matching cushion. For her second birthday, I made a cute little house cake to match all the gifts I made and gave her for her playhouse. This year she has asked for a Hello Kitty cake. I'll be making a few other Hello Kitty treats, too. In preparation I have started playing about with ideas...

After a few attempts at making fruit flavoured Hello Kitty jellies, I finally got the taste and texture right. Here's how...

Raspberry jelly candies (makes 24 jellies)

Ingredients
  • 1 pack of raspberry jelly (Jello) (135g)
  • 4 sheets of gelatine
  • 80ml water
  • 3 tbsp condensed milk

Tools & equipment
  • Hello Kitty mould x2
  • Pipette

Making Hello Kitty candy

Cooking instructions
  1. Place gelatine sheets in cold water and leave for at least five minutes
  2. Place raspberry jelly cubes in a microwaveable jug
  3. Add 80ml of water
  4. Heat for approx. 1 minute
  5. Stir until completely dissolved
  6. Remove soaked gelatine sheets from bowl of water and add to dissolved raspberry jelly mix and stir till dissolved
  7. Using a pipette, carefully squeeze melted jelly mixture into Hello Kitty bows & noses
  8. Place the moulds into the fridge
  9. Add the condensed milk to the remaining melted jelly mixture and stir thoroughly till you have an even colour
  10. Remove moulds from fridge and pour jelly mixture into moulds
  11. Place in fridge overnight to set
  12. Carefully turn out Hello Kitty raspberry jellies

Hello Kitty serving
Hello Kitty & friends candy
Home made Hello Kitty candy, yummy!

Now I want to play with the colour, as I think the pink looks too dark against the red bow!

Have a sweet day!

Thứ Ba, 29 tháng 11, 2011

Candy filled stars

Candy filled stars

I love hanging candy on my Christmas year and this year is no exception. I loved how my candy filled Easter eggs turned out, so I bought some plastic stars and filled them with juicy pear, vanilla, bubblegum and blueberry flavoured Jelly Belly beans to match my colour palette.

Candy filled stars

Tools and Materials


How-to, step by step
Jelly Belly stars steps1 - 4
Wash and dry the plastic stars before you start. Fill half the plastic star with as many jelly beans as you can, and carefully push the lid on top. Starting at the top of the star, wrap washi tape round the closed sides and trim off any excess. Thread ribbon through the two holes at the top of the star, and knot ends together.

Have a sweet day!

Thứ Ba, 12 tháng 7, 2011

M&M World comes to England

M&M World, London, England

When I heard that M&M World had opened in Leicester Square, I just had to stop by! I usually have to rely on my trips to the US to stock up on M&M's in a variety of colours from their twenty two different ones. I love using them for the roofs on my gingerbread bird houses and filling candy jars with them to co-ordinate with my candy tables. Now I can get them in all twenty two colours within a short trip after work!

M&M world opened it's first store in 1997 in Las Vegas, in 2005 in Orlando, Florida and a year later in 2006 they opened one at Times Square, New York. On Monday 13th June 2011, M&M's World store in London officially opened to the public, in Leicester Square. It is the world's largest candy store, at 35,000 sq ft, bigger even than the store in New York City. It sells a variety of M&M merchandise from clothing and sporting goods to home wares, stationery and toys. The London store is decked out with a London red bus, giant M&M's dressed up as knights and guards and, of course, lots and lots of M&M's!

Thứ Sáu, 20 tháng 5, 2011

Hand-made chocolate butterflies

Hand-made Chocolate butterflies by Torie Jayne
Chocolate butterflies
What you will need:


Instructions
  1. Temper (melt) white chocolate
  2. Stir in pink powdered food colouring a little at a time until you have desired colour. Stir well so colour is even
  3. Spoon chocolate into icing bottle or bag fitted with a small nozzle
  4. Squeeze chocolate into moulds
  5. Lightly tap moulds so chocolate lays flat and air bubbles are removed, and leave to set
  6. Turn out chocolate butterflies
  7. Repeat steps 1-6 with blue food colouring


Hand-made blue and pink butterfly chocolates

I displayed my chocolate butterflies in my perch glass apothecary jar with pink and white Easter M&M candy on my Easter table this year. I love how bright and colourful they look and will definitely be using this idea again on my candy tables and not just at Easter!


Hand-made chocolate butterflies and M&M's
Hand-made chocolate butterflies packaged up
Hand-made blue chocolate butterflies packaged up

Have a sweet day!

Thứ Tư, 11 tháng 5, 2011

Hand-made honeycomb chocolate bunny head

Rabbit printed foil wrapped chocolate bunny head

Last Easter I made chocolate bunny heads filled with home-made honeycomb and they went down such a treat with my friends! This year I made them again but this time I made their faces with white chocolate and coloured their eyes with blue chocolate and their noses with pink chocolate.

Hand-made honeycomb chocolate bunny head
What you will need


Instructions
  1. Temper (melt) 2 tbsp white chocolate
  2. Place 1 tbsp of the melted white chocolate in small bowl and stir in pink food coloring until colour is even
  3. Place a small drop of pink chocolate into nose of bunny moulds
  4. Place 1 tbsp of the white chocolate in small bowl and stir in blue food coloring until colour is even
  5. Place a small drop of blue chocolate into eyes of bunny moulds
  6. Lightly tap moulds so chocolate lays flat and air bubbles are removed, and leave to set
  7. Temper (melt) rest of white chocolate
  8. Pour into bunny moulds so white chocolate is about 1 cm deep and leave to set
  9. Fill bunny moulds with chunks of honeycomb
  10. Temper (melt) milk chocolate
  11. Pour milk chocolate over honeycomb to fill the moulds and leave to set
  12. Turn out chocolate bunnies and wrap in foil.


Hand-made honeycomb chocolate bunny head
Handmade honeycomb filled bunnies
Bunny printed foil

The pretty pink rabbit aluminum foil is from Daiso Japan a Japanese 100 yen ($1, £1) store. I bought mine from Jusco, the Hong Kong equivalent of a £1 store, back in November of last year on a work trip.


Mini non-stick cake pan, 6 cavity - bunnies

Available in my store.

Have a sweet day!

Thứ Ba, 10 tháng 5, 2011

Home-made honeycomb

Bags of hand-made honeycomb

Honeycomb (makes about 10 bags)

Ingredients


Cooking instructions
  1. Grease and line baking tray with non-stick baking paper
  2. Place the sugar, honey, water and liquid glucose in a heavy based jug
  3. Heat on full power and using a candy thermometer, heat until the temperature reaches 160 deg C
  4. Remove from heat quickly
  5. Add the bicarbonate of soda and whisk immediately
  6. Pour onto a greased baking sheet and leave to cool down
  7. Break into small chunks
  8. Temper milk chocolate
  9. Dip the chunks of honeycomb into the chocolate
  10. Place on a sheet of baking paper and leave to set


Pretty paper floral bags


Candy Thermometer
I have added the candy thermometer I use to my new Amazon shop - a place where you can find lots of items I have and use here on Torie Jayne to make candy, cakes, sweet treats and more.

Have a sweet day!

Thứ Ba, 22 tháng 3, 2011

Stocking up on Easter Candy

Bunny Bowl filled with Easter Eggs
Speckled jelly eggs
Sweet Bunny
Speckled M&M eggs
Easter Bunny
I love Easter! Especially decorating for it. I have started putting my colour palette together and ordering numerous craft items, from wooden bird houses to the prettiest of ribbons.

I have also started stocking up on Easter candy. So, you can imagine my delight when I discovered that M&M's had brought out special edition Easter ones here in the UK for both the peanut variety egg shaped ones and the printed bunny choco ones in poppy pink, grass green, sunny yellow and white. I picked up several bags in Tesco and some pastel foil-wrapped chocolate ones as well. The sugary sweet speckled jelly candy is from Mr Stanley's at T.K Maxx. The pink bag of speckled M&M's were bought for me by a sweet friends on a trip to LA.

Now onto that cute bunny bowl! Last year a dear friend of mine picked me up a bunny bowl from Pottery Barn on a trip to NY to match the large Bunny I was given as a gift the year before. So, this year when the same sweet friend asked if there was anything she could pick up on a work trip to San Francisco, I immediately asked for the new bunny bowl from Pottery Barn. Isn't she pretty? Can't wait for her to meet her new friends on this year's Easter Table.

Have a sweet day!

Thứ Ba, 4 tháng 1, 2011

Candy floss white chocolate truffles

Candy floss white chocolate truffles

Candy floss white chocolate truffles (makes 16)

Ingredients
200g white chocolate drops
3 tbsp double cream (heavy cream)
1 tbsp candy floss (cotton candy) flavoured syrup
Bowl of Wilton pearlized sprinkles for rolling them in.

Cooking instructions
  1. Place the chocolate drops and cream in a medium sized saucepan on a medium heat.
  2. Stir until chocolate has completely melted and has a smooth texture.
  3. Remove from heat and whisk in candy floss flavouring.
  4. Pour into small bowl and refrigerate for about 1 1/2 hours, or until set.
  5. Scoop 1 tbsp of chocolate mix into your hand and roll into a ball shape.
  6. Roll in sprinkles to coat.
  7. Refrigerate to store, for up to a week (but best served at room temperature).


Hand-made candy floss flavoured white chocolate truffles

Hotel Chocolat sent me some 40% milk chocolate drops and some white chocolate drops to play with. Knowing how much my older sister loves Hotel Chocolat chocolate I thought I would make some chocolate truffles to sit on my Winter Woodland dessert table. I started off with rich milk chocolate ones, then went onto mixing other flavours in them like the delicious Baileys ones and seasonal toffee apple ones and covering them in shimmering shades.

Then it was time to turn my attention to the white chocolate drops! I again started off with simply indulgent plain white chocolate ones, then tried lemon meringue, and lastly here are some candy floss flavoured ones. I had picked up a bottle of candy floss flavouring on a trip to Paris and had been itching to try it out. I love the subtle flavour they give them.

Hand made truffles

Here they are on My Winter Woodland dessert table

Don't forget Hotel Chocolat giveaway end this saturday!

Have a sweet day!

Chủ Nhật, 2 tháng 1, 2011

Lemon meringue white chocolate truffles

Lemon meringue white chocolate truffles

Lemon meringue white chocolate truffles (makes 16)

Ingredients
200g white chocolate drops
3 tbsp double cream (heavy cream)
1 tsp natural lemon flavouring
8 small meringues, crushed
White chocolate vermicelli for rolling them in.

Cooking instructions
  1. Place the chocolate drops and cream in a medium sized saucepan on a medium heat.
  2. Stir until chocolate has completely melted and has a smooth texture.
  3. Remove from heat and whisk in lemon flavouring and crushed meringues, until you have a smooth consistency.
  4. Pour into small bowl and refrigerate for about 1 1/2 hours, or until set.
  5. Scoop tsp of chocolate mix into your hand and roll into a ball shape.
  6. Roll in vermicelli to coat.
  7. Refrigerate to store, for up to a week (but best served at room temperature).


Hand-made lemon meringue white chocolate truffles

Hotel Chocolat sent me some 40% milk chocolate drops and some white chocolate drops to play with. Knowing how much my older sister loves Hotel Chocolat chocolate I thought I would make some chocolate truffles to sit on my Winter Woodland dessert table. I started off with rich milk chocolate ones, then went onto mixing other flavours in them like the delicious Baileys ones and seasonal toffee apple ones.

Then it was time to turn my attention to the white chocolate drops! I again started off with simply indulgent plain white chocolate ones, then as my favourite fudge flavour is lemon meringue I thought I would try lemon meringue truffles. They taste delicious and I am so happy with how they turned out.

Have a sweet day!

Thứ Năm, 30 tháng 12, 2010

White chocolate truffles

White chocolate truffles by Torie Jayne

White chocolate truffles (makes 35)

Ingredients
400g white chocolate drops
6 tbsp double cream (heavy cream)
1 tsp natural vanilla extract
Bowl of silver vermicelli for rolling them in.

Cooking instructions
  1. Place the chocolate drops and cream in a medium sized saucepan on a medium heat.
  2. Stir until chocolate has completely melted and has a smooth texture.
  3. Remove from heat and whisk in vanilla extract.
  4. Pour into small bowl and refrigerate for about 1 1/2 hours, or until set.
  5. Scoop tsp of chocolate mix into your hand and roll into a ball shape.
  6. Roll in vermicelli to coat.
  7. Refrigerate to store, for up to a week (but best served at room temperature).


Hand-made white chocolate truffles

Hotel Chocolat sent me some 40% milk chocolate drops and some White chocolate drops to play with. Knowing how much my older sister loves Hotel Chocolat chocolate I thought I would make some chocolate truffles to sit on my Winter Woodland dessert table. I started off with rich milk chocolate ones, then went onto mixing other flavours in them like the delicious Baileys ones and seasonal toffee apple ones. Then it was time to turn my attention to the white chocolate drops! I again started off with simply indulgent plain white chocolate ones.

Have a sweet day!

Thứ Tư, 29 tháng 12, 2010

Toffee apple milk chocolate truffles

Toffee apple milk chocolate truffles

Toffee apple milk chocolate truffles (makes 16)

Ingredients
200g 40% milk chocolate drops
3 tbsp double cream (heavy cream)
1 tbsp toffee apple flavouring
Metallic gold sanding sugar for rolling them in.

Cooking instructions
  1. Place the chocolate drops and cream in a medium sized saucepan on a medium heat.
  2. Stir until chocolate has completely melted and has a smooth texture.
  3. Remove from heat and whisk in toffee apple flavouring.
  4. Pour into small bowl and refrigerate for about 1 1/2 hours, or until set.
  5. Scoop tsp of chocolate mix into your hand and roll into a ball shape.
  6. Roll in sanding sugar to coat.
  7. Refrigerate to store for up to a week (but best served at room temperature).


Hand-made toffee apple flavoured chocolate truffles

Hotel Chocolat sent me some 40% milk chocolate drops to play with. Knowing how much my older sister loves Hotel Chocolat chocolate I thought I would make some chocolate truffles to sit on my Winter Woodland dessert table. I started off with rich milk chocolate ones, then went onto mixing other flavours in them like the delicious Baileys ones yesterday. Now here are some toffee apple flavoured ones using toffee apple syrup I picked up on a trip to Paris earlier this year.

Have a sweet day!

Thứ Ba, 28 tháng 12, 2010

Bailey's milk chocolate truffles

Bailey's Milk Chocolate Truffles

Bailey's Milk Chocolate Truffles (makes 24)

Ingredients
200g 40% milk chocolate drops
3 tbsp double cream (heavy cream)
1 1/2 tbsp Baileys Irish Cream liqueur
Bowl of metallic gold sanding sugar for rolling them in.

Cooking instructions
  1. Place the chocolate drops and cream in a medium sized saucepan on a medium heat.
  2. Stir until chocolate has completely melted and has a smooth texture.
  3. Remove from heat and whisk in Baileys.
  4. Pour into small bowl and refrigerate for about 1 1/2 hours, or until set.
  5. Scoop tbsp of chocolate mix into your hand and roll into a ball shape.
  6. Roll in sanding sugar to coat.
  7. Refrigerate to store, for up to a week (but best served at room temperature).


Hand-made Baileys chocolate truffles

Hotel Chocolat sent me some 40% milk chocolate drops and white chocolate drops to play with. Knowing how much my older sister loves Hotel Chocolat chocolate I thought I would make some chocolate truffles to sit on my Winter Woodland dessert table. I started off with rich milk chocolate ones, then went onto mixing other flavours in them like these delicious Baileys ones!

Have a sweet day!

Thứ Hai, 27 tháng 12, 2010

Hotel Chocolat double milk chocolate truffles

Hotel Chocolat double milk chocolate truffles by Torie Jayne

Hotel Chocolat double milk chocolate truffles (makes 28)

Ingredients
200g 40% Milk chocolate drops
3 tbsp double cream (heavy cream)
1 tsp natural vanilla extract
Liquid chocolate - classic milky for coating.

Cooking instructions
  1. Place the chocolate drops and cream in a medium sized saucepan on a medium heat.
  2. Stir until chocolate has completely melted and has a smooth texture.
  3. Remove from heat and whisk in vanilla extract, until you have a smooth consistency.
  4. Pour into small bowl and refrigerate for about 1 1/2 hours, or until set.
  5. Scoop tbsp of chocolate mix into your hand and roll into a ball shape.
  6. Roll in liquid chocolate flakes to coat.
  7. Refrigerate to store for up to a week (but best served at room temperature).


Hand-made chocolate truffles

Hotel Chocolat sent me some 40% milk chocolate drops and white chocolate drops to play with. Knowing how much my older sister loves Hotel Chocolat chocolate I thought I would make some chocolate truffles to sit on my Winter Woodland dessert table.

To start here are some plain chocolate ones that I decadently rolled in Hotel Chocolat drinking chocolate flakes so they were pure Hotel Chocolat!

Have a sweet day!

Thứ Bảy, 18 tháng 12, 2010

Winter Woodland candy cones

Winter Woodland candy cones

Winter woodland candy cones

You will need:
Cone wrapper
Double sided tape
Polka dot cellophane
Ribbon

Equipment
Tim Holtz Non Stick Micro-Serrated Multicutter
Shape~Mates Circles
Shape~Mates Carriage

Instructions
  1. Open cone print template (see image below) and print it out.
  2. Cut around cone wrapper and along lines to give 3 wrappers. (I use the shape mates large circle and cutter to cut out my circles.
  3. Roll one of the wrappers into a cone shape and, using double sided tape, fix in place.
  4. Place a second piece of tape inside the cone along one side and peel off backing.
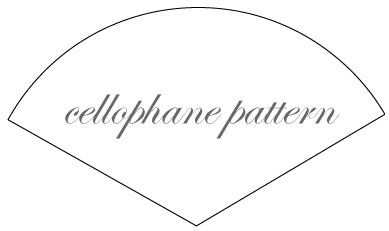
  5. Cut out cellophane (use the "cellophane pattern" below as a stencil to cut out your cellophane - note each straight line is 24cm long).
  6. Roll cellophane into a cone shape and place inside cone wrapper. Press against the tape to fix in place.
  7. Fill with candy.
  8. Tie ribbon around the top.


Making Candy Cones
Winter Woodland Candy Cones
Cellophane pattern

Last year I made candy cones for Halloween & Christmas. This year I custom designed some for a friend of mine to give out as wedding favours. Four of us spent several hours putting together over 100 of them to be filled with sugared almonds. So, this Christmas I have designed them around my winter woodland theme and filled them with hand-made nut shaped chocolates with creamy maple centres.

Maple cream filled hand made chocolates


Have a sweet day!