Thứ Ba, 24 tháng 1, 2012

Mini gluten free raspberry trifles

Mini gluten free raspberry trifles by Torie Jayne

I love trifle but, being gluten intolerant I can only have it if I or my Mum makes it. This past Christmas I made some mini raspberry trifles which I served on my mini dessert stand.

Raspberry Trifle (makes 7 mini jars)

Ingredients

7 amaretti biscuits (make sure they are gluten free)
3 1/2 tbsp Amaretto liqueur
21 raspberries
1 packet of raspberry jelly made up as instructions
1 pint of fresh custard
150 ml double cream
1 tbsp toasted flaked almonds


Cooking instructions

  • Place an ameretti biscuit in the bottom of each jar and crush with the end of a wooden spoon until you have a flat surface
  • Pour 1/2 a tbsp of Ameretto into each jar
  • Place three raspberries on top of each crushed ameretti biscuit
  • Divide freshly made jelly between the jars, place in fridge until set
  • When jelly is set, pour cooled fresh custard over the jelly and leave to cool
  • Whip double cream with a pinch of sugar until you get stiff peaks
  • Fill piping bag fitted with a star nozzle with whipped double cream and pipe a star on top of each trifle
  • Sprinkle top of each trifle with toasted almonds
  • Keep in fridge until serving


Mini Trifles

Have a sweet day!

Thứ Hai, 23 tháng 1, 2012

Spring Pastels

Spring Pastels
Source 1,2,3,4

Last week I went to the Top Drawer interior show at Earl's Court in London. It was full of great stands full of all the new Spring products hitting the stores soon. I especially loved the abundance of soft, chalky pastel colours for every room in the house!

So this week on Inspirational Pins I wanted to share with you my current fave pastel interior shots from my Pinterest boards. From the gorgeous striped feature wall and pretty floral cushions in the living room to the stack of candy striped tins adorned with birds and fauna. A pastel pink Smeg fridge and lavender oven set against duck egg blue units and, last but not least, the candy coloured crockery set hanging on the wall.

Have a sweet day!

Chủ Nhật, 22 tháng 1, 2012

Printers Tray

Printer Tray

This week on Flickr Faves Sunday, I bring you a selection of white printers trays full of pretty treasures.

Some beautiful shots from my Flickr favourites:


I love the one my Dad gave me which I painted white and filled with all my white, aqua and silver beads. I think I might need to get another one after seeing these gorgeous picks. Best place to find one? Ebay.

Sequin storage

Have a sweet day!

Thứ Bảy, 21 tháng 1, 2012

Decorating my bird cage cake

Decorating my bird cage cake

Several weeks ago I shared with you my Christmas cake, shaped like a bird cage and then how to marzipan bird cage shaped cake. Last week I shared how I iced my cake, so finally this week I show you how I decorated it!

How to decorate bird cage shaped cake
Ingredients


Equipment
  • Rolling pin
  • Bakers twine
  • Pins
  • Piping bag fitted with small circular nozzle
  • Wooden cocktail sticks
  • FMM textured lace set


Method
Decorating my bird cage shaped cake steps 1-4

  • To get your bird cage even, start by placing a length of bakers twine over the top of your cake and pin in place, so that you have divided the cake in half
  • Continue pinning bakers twine to your cake until you have segmented the cake into 12 pieces
  • Lightly push the string into the cake so you are left with small indentations and remove string entirely
  • Lightly sieve icing sugar on to your work top and knead white icing until soft and pliable. Then, using a rolling pin, roll into a long shape about 5mm thick, i.e. at least the width of the lace imprint and long enough to go round the cake


Decorating my bird cage shaped cake steps 5-8
  • Push lace imprint into rolled out icing strip, continue until strip has imprint from end to end. Using a sharp knife, trim sides of strip, lightly brush cooled boiled water onto back of strip and adhere to bottom of cake. Trim off excess at ends
  • Make up royal icing as package instructions
  • Spoon into piping bag fitted with circular nozzle


Decorating my bird cage shaped cake steps 9-12
  • Starting at the top of the cake, carefully pipe a strip of royal icing down one of the indentations in the cake
  • Continue until you have all of the cage spindles piped
  • Roll out fondant icing as before and cut a small circle out using a round cookie cutter, lightly brush the back of your fondant circle with water and place at top of the cake in the centre
  • Then roll a small ball out of white fondant icing and attach to the top of the cake using a wooden tooth pick


Decorating my bird cage shaped cake steps 13-16
  • Lightly sieve icing sugar on to your work top and knead white icing until soft and pliable. Then, using a rolling pin, roll into a long shape about 5mm thick, that is at least the width of the lace imprint and long enough to go round the cake
  • Push lace imprint into rolled out icing strip, continue until strip has imprint from end to end
  • Using a sharp knife, trim sides of strip, lightly brush cooled boiled water onto back of strip and adhere to the top straight part of the cake. Trim off excess at ends


Decorating my bird cage shaped cake steps 17-20
  • Brush edible white glitter on to spindles of cage
  • Continue brushing white edible glitter on to cage
  • Brush aqua cake shimmer onto blue icing
  • Work out the position of your petal paste bird and push bird foot into cake


Decorating my bird cage shaped cake steps 21-24
  • Pipe a small dab of white royal icing onto the front of your fondant bird, line bird up with its foot and push into the side of the cake
  • Pipe a small dab of royal icing onto the back of the fondant roses and place them at the top and bottom of the cake
  • Pipe a small dab of royal icing onto the back of the holly leaves and place them at the top and bottom of the cake


Putting the finishing touches on my Christmas cake
  • Pipe a small dab of white royal icing onto the edible pink beads and place next to the holly leaves on the cake
  • Using edible glitters, dust roses with pink glitter and leaves with green glitter
  • Pipe a small dab of white royal icing onto the back of the snowflakes and place on cake
  • Attach iced ring to ball on top of cake and lightly dust entire cake with sieved icing sugar


Here it is on my Winter Wonderland table

Bird cage cake

Have a sweet day!

Thứ Sáu, 20 tháng 1, 2012

Miss Etoile @ Top Drawer Spring/Summer 2012

Miss Etoile Spring 2012


Last week I showed you the gorgeous new treasures from one of my favourite interior brands, Miss Etoile. It was great to see their collection at the Top Drawer interior show in all its sugary, sparkly glory! I so need to get some of the gorgeous paper blooms and striped straws for my Summer soiree's.

Have a sweet day!

Thứ Năm, 19 tháng 1, 2012

Ferm Living Spring 2012

Ferm Living Spring 2012

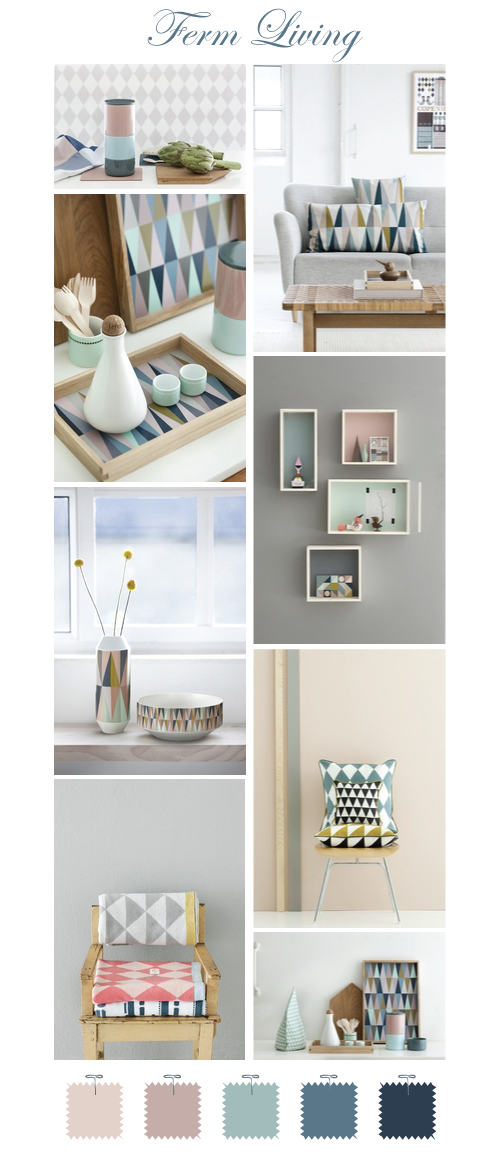
Today on label love I wanted to show you the gorgeous new treasures from another of my favourite interior brands, Ferm Living. I am loving the pretty chic colour palette of rose pink and shades of mint and teal. The signature geometric print looks great on trays, cushions and ceramics. The whimsical wallpapers look fresh and new, and the display boxes in an array of colours look great on the dove grey wall. I am coveting said display boxes and the stackable jars.

Cloudberry Living in the UK stocks a a large choice of Ferm Living, from wallpapers and cushions to the cute house wall shelves and knitted vases.

Here's how the gorgeous collection looked at the Top Drawer interior show this week.


Ferm Spring 2012
Ferm Spring 2012
Ferm Spring 2012

Have a sweet day!

Thứ Ba, 17 tháng 1, 2012

Gluten free mini key lime pies

Gluten free mini key lime pies

This past Christmas I served an array of mini desserts on my cupcake stand. For a touch of green I made key lime pies.

Gluten free mini key lime pies (makes 8 mini pies)

Ingredients


What you will need


Gluten free key lime pie steps 1-4
Gluten free key lime pie steps 5-8


Cooking instructions
  1. Preheat oven to 160 deg C, fan assisted (370 deg F)
  2. Place digestives in a bag and crush by rolling a rolling pin back and forth over the bag until you are left with crumbs
  3. In a small saucepan, melt the butter, remove from heat and stir in digestive crumbs
  4. Divide crumb mixture between the jars and press down firmly with the end of a wooden spoon or teaspoon
  5. In a bowl, whisk until combined the condensed milk, sour cream, lemon and lime juice and zest of 2 limes
  6. Pour mixture over the biscuit bases in jars
  7. Scatter the tops with remaining lime zest
  8. Bake in preheated oven for 5 mins or until tiny pin hole bubbles appear
  9. Leave to cool before placing in the fridge


Mini keylime pies

Have a sweet day!