Thứ Bảy, 30 tháng 4, 2011

Easter Fabric Birds - free pattern

Easter Fabric Birds by Torie Jayne


A couple of years ago I made felt birds for my Easter tree. This year I wanted to make some but in a style to match the birds on my bird trail fabric so I came up with my own pattern for the bird using a cookie cutter as the starting point, and added wings!
I picked up the cute pastel polka dot brushed cotton fabric from a fabulous quilting shop near Hampton Court called Creative Quilting.

Unfortunately I have only been able to finish making a couple, oh well there's always next year !?!

Easter fabric birds
What you will need:
Pattern printed out
Pencil
Pink polka dot brushed cotton
Blue polka dot brushed cotton
Pink thread
Blue thread
Pink beads
Blue beads
Green wooden beads
White sequins
Pale green embroidery thread
Pink embroidery thread
Blue embroidery thread
2mm double face satin ribbon


Easter fabric bird pattern
Easter Fabric Birds by Torie Jayne

Instructions
  1. Print out pattern, cut around edge of bird and wings. Place pattern pieces on fabric and draw around two of the birds, four of the wings
  2. Cut around pattern pieces leaving 5mm gap round pencil line, pin right sides of fabric together
  3. Hand stitch around solid pencil line, leaving the dotted line clear
  4. Turn bird and wings inside out.
  5. Easter Fabric Birds by Torie Jayne
  6. Push stuffing though hole, use chop stick to get stuffing right into the beak and tail
  7. Turn raw edges in on bottom of bird and hand stitch close, pull needle and thread up though centre of bird at top, coming through the centre of the seam. Thread 20 small wooden beads down needle so they sit at top of bird. Tie end of threads round ribbon and knot to secure. Tie knot in end of ribbon end and knot to secure
  8. Embroider three lines of stitch down tail
  9. Push stuffing through hole in end of wings, turn raw edges in and hand stitch close. Hand stitch underside of wing to body on one side, repeat with other side, angling the wing differently. Stitch sequin with small pink bead through centre for the eyes


Hand-made bird hiding in my Easter Tree

Have a sweet day!

Thứ Sáu, 29 tháng 4, 2011

A Royal Wedding

A Royal Kiss on the balcony
Cath Kidston style wedding by Wedding style guide


Royal wedding themed party by Bird


Today we celebrate the wedding of Kate and Wills. I thought she looked beautiful in her Sarah Burton designed dress with the delicate lace sleeves and he a true prince! Now it is time for tea parties and bunting!

Some of the traditional cakes that will be eaten at tea parties up and down the country today are cherry bakewell tarts, Victoria sponge, fruit scones with strawberry jam and lashings of clotted cream and Viennese fingers.

English tea party cakes
Image sources: 1, 2, 3, 4

Have a sweet day!

Thứ Năm, 28 tháng 4, 2011

Fondant Bunny & Butterflies

Fondant Bunny & Butterflies by Torie Jayne

Fondant Bunnies and Butterflies
What you will need:
White ready to roll regal ice icing (also called roll-out icing, rolled fondant or pastillage),
Sifted icing sugar (also called powdered sugar or confectioners' sugar),
Natural food colouring in the colours you want (I chose pink and blue)
Rolling pin
Plate or tray
Easter cookie cutters


Fondant flowers by Torie Jayne

Instructions
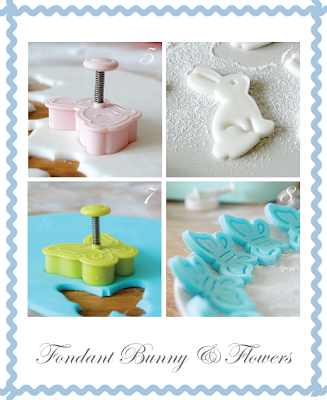
  1. Sieve icing sugar onto your work area, rolling pin and plate
  2. Knead the icing to soften, split into three parts (then gradually add food colouring to two parts until you get the desired colour for the butterflies)
  3. Thoroughly knead until colour is even, wrap cling film around the pink icing and around the blue icing, until ready to use
  4. Roll the white icing out to about 4mm thick


  5. Fondant flowers by Torie Jayne
  6. Using a cutter, cut out the bunny shape
  7. Gently push out bunny onto plate, leave to dry
  8. Roll the blue icing out to about 4mm thick, using a cutter, cut out butterflies
  9. Gently push out butterfly and lay on side of plate so butterfly does not dry flat, leave to dry, repeat with pink icing

These will last for at least six months if stored in an airtight container, but for best results use immediately.


Easter cupcake stands

Have a sweet day!

Thứ Tư, 27 tháng 4, 2011

My Easter Tree 2011

My Easter tree by Torie Jayne


As usual I was running around at the last minute before Easter trying to get my table and food looking the best I could. So, apologies for my Easter posts coming after Easter, but hey I think the tree could be cute wedding table decor.

I love Easter trees and have made several over the years. From the bird-filled one of 2009 or last year's cherry blossom sprigs in a vase. This year I wanted to make my Easter tree look like a mini potted tree. After gathering a couple of handfuls of twigs in the local woods I used a similar method to my Halloween tree but this time doing it in soft pastel shades of green.

I also wanted to add flowers and went for making my own paper ones so I could match the colours perfectly to my Easter colour palette. I then hung hand painted butterflies, hand decorated eggs and handmade birds, all in my Easter colours. Unfortunately I ran out of time and only finished a couple of my birds (free pattern and how-to coming soon!). I think the fabric birds would look cute around the house at any time of year!

Easter Tree
What you will need:
Branches
Plant pot
Pink paper filler
Pale green paint
Apple green paint
Plastic leaves
Small pebbles
Pink paper flowers
Blue paper flowers
Easter hanging butterflies
Decoupage eggs
Hand-painted surprise eggs
Candy filled Easter eggs
Polka dot Fabric birds
PVA glue
Glue gun
Masking tape

My Easter Tree


Instructions
  1. Lay branches out on newspaper
  2. Spray branches with white paint and leave to dry
  3. Arrange branches together and wrap in masking tape to secure
  4. Paint plant pot, leave to dry
  5. My Easter Tree
  6. Place branches in pot and fill with small pebbles, pour PVA over the top of the stones and leave to dry
  7. Paint branches with pale green paint
  8. Attach pink and blue flowers to the branches using glue gun
  9. Cover pebbles in pot with pink paper filler
  10. My Easter Tree
  11. Paint plastic leaves and leave to dry
  12. Attach leaves to branches using glue gun
  13. Hang butterflies
  14. Hang eggs


My Easter Tree

Have a sweet day!

Thứ Ba, 26 tháng 4, 2011

Fondant Flowers

Fondant flowers by Torie Jayne

Fondant Flowers
What you will need:
White ready to roll regal ice icing (also called roll-out icing, rolled fondant or pastillage),
Sifted icing sugar (also called powdered sugar or confectioners' sugar),
Natural food colouring in the colours you want (I chose pink and blue)
Rolling pin
Plate or tray
Set of 4 Flower Blossom Plunger Cutters for Icing & Cake Decoration


Fondant flowers by Torie Jayne

Instructions
  1. Sieve icing sugar onto your work area, rolling pin and plate
  2. Knead the icing to soften, then gradually add food colouring until you get the desired colour.
  3. Thoroughly knead until colour is even
  4. Roll the icing out to about 4mm thick


  5. Fondant flowers by Torie Jayne
  6. Using a cutter, cut out the flower shape
  7. Gently push out flower onto plate
  8. Push decorative ball into hole
  9. Leave to dry


These will last for at least six months if stored in an airtight container, but for best results use immediately.


Pink Fondant Flowers
Fondant Flowers

Have a sweet day!

Chủ Nhật, 24 tháng 4, 2011

Thank you cards shop giveaway winner

Torie Jayne Giveaway
My contest ended yesterday and I just picked a winner using random.org and I am delighted to announce the winner of the Thank you cards shop is...

Drumroll please? Without further ado, the lucky winner is...

Erin, of sweet blog Lucky by Design about interiors, baking and more, who was loving the Elephant with Balloons thank you cards. Please e-mail me your details.

Congratulations Helen, you will receive $50 of store credit for Thank you cards shop

Thank you to all of you sweets that entered, to my loyal followers and new friends.


Have a sweet day!

Easter Chocolate lollipops

Easter Chocolate lollipops by Torie Jayne

I love chocolate, so when the lovely people at Hotel Chocolat sent me a load of white chocolate drops, I was so excited. I love how easy it is to melt the chocolate drops and the taste, well yummy!

What could I make this time? I started by ordering some bunny and leaf lollipop moulds as I love how sophisticated the bunny moulds look. After making some white chocolate Easter bunny lollipops I had a go at colouring the chocolate using powdered green colouring. I made the chocolate leaf lollipops in green chocolate and thought they looked like lettuce leaves that the bunny could sit amongst. After experimenting with a few glasses, jars, pots etc. I settled on using the shot glasses filled with some edible green grass I picked up on a recent trip to Butlers.

I will be using them tomorrow as table settings for my guests at my Easter Monday tea party. Now I must dash as I have lunch at my folks and a special little lady is playing the Easter Bunny this year! Then later tonight I will be setting up my Easter table and adding the finishing touches to my cupcakes!

Easter Chocolate lollipops
What you will need:
Sitting bunny lollipop moulds
Leaf lollipop moulds
White chocolate drops
Green dusting powder
2mm pink double faced satin ribbon
2mm blue double faced satin ribbon
5mm blue gingham ribbon
5mm pink gingham ribbon
Edible green grass
Six shot glasses


Easter Chocolate lollipops by Torie Jayne

Instructions
  1. Temper (melt) and colour your chocolate, place lollipop sticks in moulds
  2. Squeeze chocolate into moulds
  3. Lightly tap moulds so chocolate lays flat and air bubbles are removed, and leave to set
  4. Turn out chocolate lollipops


  5. Easter Chocolate lollipops by Torie Jayne

  6. Tie gingham ribbon around bases
  7. Make a bow and trim ends
  8. Repeat step 1-4 with white chocolate in Easter bunny lollipop moulds
  9. Tie 2mm ribbon into a bow around neck of bunny


  10. Easter Chocolate lollipops by Torie Jayne

  11. Shred edible grass
  12. Fill shot glass with edible grass
  13. Place leaf lollipops in edible grass
  14. Place Easter bunny lollipop in centre of leaf lollipops


Hand-made Easter Chocolate lollipops

Have a sweet Easter!

Thứ Bảy, 23 tháng 4, 2011

Candy Filled Easter Eggs

Candy Filled Easter Eggs by Torie Jayne


I had a few spare clear hanging eggs so I thought I would fill them with pretty coloured vanilla, green tea and cotton candy flavoured Jelly Belly beans to hang on my Easter tree. After tea I am going to hang them in the garden as part of my Easter Egg Hunt!

Candy Filled Eggs
What you will need:
12 transparent plastic eggs
Green 2mm double face satin ribbon
Green gingham ribbon 5mm wide
Jelly Beans
Double sided tape


Candy Filled Easter Eggs by Torie Jayne

Instructions
  1. Cut gingham ribbon to size and lay double sided tape on back, trim to fit
  2. Stick ribbon to top half of egg around opening
  3. Cut ribbon to size and knot ends, thread through hole in top of egg
  4. Fill with jelly beans and snap together


Candy Filled egg

Have a sweet Easter!

Thứ Sáu, 22 tháng 4, 2011

Hand painted surprise eggs!

Hand painted surprise eggs by Torie Jayne


Years ago I remember seeing in a magazine some glass jars that had been painted on the inside and I loved how they looked. So I thought I would have a go at painting the inside of my clear plastic eggs. They looked great except for the ugly looking join. That was fixed by covering the join in gingham ribbon. I then filled them with chocolate Easter eggs and a little chick and hung them on my Easter tree! Now only if I could find time to finish my hand-made birds.....

Hand painted surprise eggs
What you will need:
12 transparent plastic eggs
Pink embroidery thread
Blue embroidery thread
12 White beads
Double sided tape
6 pink mini fluffy chicks
6 blue mini fluffy chicks
12 Foil wrapped chocolate eggs
Pink gingham ribbon 5mm wide
Blue gingham ribbon 5mm wide
Pink paint
Blue paint


Hand painted surprise eggs by Torie Jayne

Instructions
  1. Paint inside of top half of egg, leave to dry
  2. Paint inside of bottom half of egg, leave to dry
  3. Cut embroidery thread to size and thread ends through top of egg, thread a white bead through both ends of thread and knot
  4. Cut ribbon to size, and cover back in double side tape


  5. Hand painted surprise eggs by Torie Jayne

  6. Peel off double sided tape backing and carefully secure ribbon round open edge of top half of egg
  7. Place one chocolate egg inside bottom half of egg
  8. Add small fluffy chick to bottom half of egg
  9. Snap together


Hand-painted Easter surprise eggs!
Surprise Easter eggs

Have a sweet day!

Thứ Năm, 21 tháng 4, 2011

Découpage Eggs

Découpage Eggs by Torie Jayne


In recent years I have needle felted eggs, hand painted eggs and sewed eggs. This year I thought I would have a go at some découpage eggs to hang on my Easter Tree. I had some pink spotty napkins I had picked up last year in Clas Ohlson and some blue gingham napkins I had bought earlier this year on a trip to Berlin. They were a perfect colour match to this year's Easter theme so I used them for the découpage.

After covering half an egg in masking tape I carefully removed it and cut into the centre until I could lay the masking tape out flat. I used this as my pattern to cut out the napkins. I love how they turned out and think the pretty egg hangers in silver really make them special.

Later today I will be sharing with you my hand painted eggs with a surprise!

Découpage Eggs
What you will need:
12 Ribbon hanging plastic eggs
12 Egg hangers
3 Pink spotty paper napkins
3 Blue polka dot napkins
PVA glue
Pink gingham ribbon 5mm wide
Blue gingham ribbon 5mm wide


Découpage Eggs by Torie Jayne

Instructions
  1. Remove plastic stopper
  2. Cut out oval from napkins, and remove all backing so you have a single sheet of napkin
  3. Paint half of egg in PVA glue, and carefully place napkin in centre, brush PVA glue on top of napkin with a paint brush, smoothing out all wrinkles, leave to dry
  4. Repeat on other side


  5. Découpage Eggs by Torie Jayne

  6. Cut ribbon to fit around egg
  7. Paint a line of PVA glue around joins of decoupage, place ribbon over joins and paint PVA glue on top smoothing down edges
  8. Push egg hanger into top of eggs through hole
  9. Tie white ribbon from egg stoppers though hanger loop and knot at end


Hanging Découpage Eggs

Have a sweet day!

Thứ Tư, 20 tháng 4, 2011

Hotel Chocolat Easter Egg Winner

Torie Jayne Giveaway
My contest ended yesterday and I just picked a winner using random.org and I am delighted to announce the winner of the Hotel Chocolat Giveaway is...

Drumroll please? Without further ado, the lucky winner is...

Michelle, of Crafty Learner a sweet blog about making jewelry amongst other treasures, who was loving the Eggs and Soldiers. Please e-mail me your details.

Congratulations Helen, you will receive a Your Eggsellency™ Extra Thick Easter Egg from Hotel Chocolat.

Thank you to all of you sweets that entered, to my loyal followers and new friends.


Have a sweet day!

Blue Flowers for my Easter tree

Blue Flowers for my Easter tree


Earlier today I showed you the paper pink flowers I am using on my Easter Tree and now here are the pale blue ones. I used the Bird Trail fabric as inspiration for these flowers too!

Easter Blue Flowers
What you will need:
Petal Pairs Box Set 2
Pale blue Card
White sequins
PVA glue


Blue Flowers for my Easter tree


Instructions
  1. Cut 1 pale blue flower from one punch
  2. Cut 1 pale blue flower from the other punch
  3. Fold in petals on the petal punches, tuck one petal punch into another
  4. Dab a small amount of PVA glue in centre of flower, press sequin down, leave to dry


My Easter Tree

Have a sweet day!

Pink Flowers for my Easter tree

Pink Flowers for my Easter tree


When I saw the paper punch petal pairs on the Tonic Studio website I just had to give them a go! I made loads of different varieties with them just to see all the combo's. I then had the idea of making some paper flowers for this year's Easter Tree. I used the Bird Trail fabric as inspiration for the flowers I would use on my Easter Tree. First up are the pretty pink paper flowers with a dark pink centre.

Easter Pink Flowers
What you will need:
Petal Pairs Box Set 2
Petal Pairs Box Set 1
Pale Pink Card
Dark Pink Card
Flamingo Fun pink paint


Pink Flowers for my Easter tree


Instructions
  1. Cut 2 pale pink flowers
  2. Cut 1 dark pink flower
  3. Fold in petals on the three petal punches, tuck one pale pink petal punch into another
  4. Paint the pale pink flowers, stick dark pink petal in centre


Paper Pink Flowers
Paper Pink Flowers on my Easter Tree

Have a sweet day!